Showing posts with label strobe. Show all posts

Monday, June 27, 2011

35/52 - Yet another pair

A pair of high heeled shoes
Yet another pair

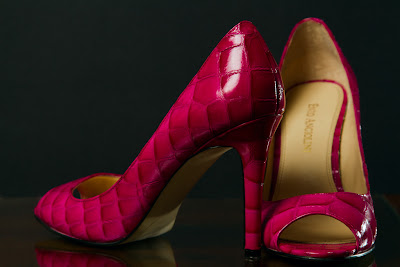
I've never understood women and their need for shoes. However, with my wife bringing so many of them home I guess it was only a matter of time before I decided to photograph them as part of this project. I went for a black background to make the colour of the shoes stand out a bit. 

Lighting setup after the jump.

Lihting setup for a pair of high heeled shoes
Lighting setup - Yet another pair

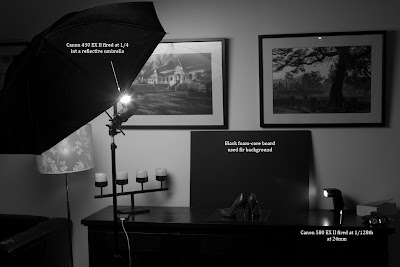
This was a two light setup.

I fired the Canon 430 EX II at 1/4th into a reflective umbrella. This was the main light and also created the specular highlight on the back of the shoe on the left. 

I used the Canon 580 EX II fired at 1/128th as the key light. It's effect is subtle. The highlight on the shoe on the right and the back of the shoe on the left were created by it. 

I also used a black foam-core board as the background and placed the shoes on a piece of glass to create a reflection.
Monday, June 20, 2011

34/52 - A Mars a day

A Mars a day
A Mars a day

The inspiration for this weeks entry for the project came from an advertisement for Mars bars that runs on TV. The actual shot in the commercial is a lot closer than this one but I wanted to include the texture of the chocolate on the top of the bar and had to shoot a bit wider as a result. I felt this composition was better than a zooming right into the chocolate and making the nougat the dominant feature.
Lighting setup after the jump.

Lighting setup - A Mars a day

This was a two light setup.

The texture for the chocolate came from the main light which was a Canon 430 EX II fired at 1/8th into a reflective umbrella which was placed behind the subject on the right of camera (about 2 o'clock on the final shot).
The insides of the chocolate was lit by a Canon 530 EX II fired at 1/16th through a home made grid spot from below the subject. The chocolate was placed on a piece of glass and this created a reflection. 

A Piece of white paper was placed just out of frame on camera left to bounce the main light onto the subject and light the other side of the chocolate.

A black foam-core board was placed behind the chocolate for the background.

Sunday, June 12, 2011

33/52 - The Macro

The Macro
The Macro

I photographed my macro lens for this weeks entry. The challenge with this photograph was controlling the specular highlight on the lens itself. I had thought the process through and was happy with the fact that I had to actually use only one light setup. At lest I seem to be learning something! I used a two light setup for this one.

Lighting setup shots after the jump.

Lighting setup - The Macro

The lens was lit using a snooted Canon 430 EX II fired at 1/8th through a 1/2 CTB gel. I used the snoot because I only wanted a section of the lens to be lit. The highlight on the edge of the lens was created by this flash.

The specular highlight on the lens was created by a Canon 580 EX II fired at 1/32 into a white foam-core board on the right of the frame. 

Monday, June 6, 2011

32/52 - The Rose

The Rose
The Rose

This weeks entry for the project was fairly quick and pain free. I used a single strobe and the macro lens to produce the shot above. I did move the flash around a bit to add a bit more depth to the image by creating shadows of the layers of petals. I converted the shot into a black and white image and I'm quite happy with the result.

Lighting setup shots and a black and white version after the jump.

Lighting Setup - The Rose

I used a Canon 580 EX II fired at 1/16th to light the flower. Looking down at the end result, the strobe was positioned at about 2 o'clock. The flower used for the shot is highlighted in the setup above.

Here's the black and white version.

The Rose in Black and White


Tuesday, May 24, 2011

30/52 - Pomegranate

Pomegranate

Its Pomegranate season so I thought I'd use one for this weeks shot. I'm not too sure about the composition for this one and would like to get your feedback on it. I thought of including a few of the seed casings in the fore ground to add another layer of interest to the composition and the Pomegranate itself to the top right hand corner to fill up the empty space.

Lighting setup inside.

Lighting setup - Pomegranate

This was a one light setup. A conon 430 EX II was fired into a reflective umbrella from behind the subject on camera right (about two o'clock). The flash was fired at 1/4th power. A white foam-core board was placed just out of the frame on camera left to bounce the light back onto the fruit.

Tuesday, May 17, 2011

29/52 - Spaghetti from Above

Spaghetti from Above

This weeks entry for the project is quite literally, Spaghetti from above. I saw a similar photograph on flickr sometime ago and really liked the way the Spaghetti seemed to be shooting out at you from the black center. It sort of looked like a long exposure shot of fireworks to be honest.

Lighting setup shots and details after the jump.

Lighting Setup - Spaghetti from Above

Although two flashes are visible in the setup shot only one is actually lighting the subject. I used the second lash to trigger the first one. I was using the flash control system on the 7D which relies on the on camera flash to trigger the external flashes. I could have use my Cactus triggers and a single flash but why simplify something that can be complicated?
The light for this image was from a Canon 430 EX II fired at 1/2 power into a reflective umbrella from above the subject on the right of camera. The Canon 580 EX II was used to trigger the 430 EX II. I couldn't trigger the 430 EX II as the flash from the 7D was pointing down at the subject and would not be "seen" by the 430 EX II above.

Tuesday, May 10, 2011

28/52 - Oreos... Dunk or Lick??

Oreos - Dunk or Lick??

I wanted to take a photograph that actually highlighted the texture on the face of an Oreo for this weeks entry. To be honest I'm not thrilled about this shot. The glass of milk isn't too obvious as only a small part of it is visible. I didn't want to zoom out as that would have resulted in the cookie being small and less dominant in the frame. The only reason I included the glass of milk is because I thought it balanced the image. Please let me know what you think in the comments.

Lighting setup inside.

Lighting Setup - Oreos... Dunk or Lick??

This was a two light setup, I would have used a light tent but improvised as I don't have one.

I used two white foam-core boards and a white wall around the subject to bounce the light. I placed the cookies and the glass of milk on a white sheet of A4 paper to create the white background.

A Canon 430 EX II was fired at 1/16th and zoomed to 24mm at the white foam core board on the right of the subject.

A Canon 580 EX II was fired at 1/128th and zoomed to 50mm aimed at the cookie and fired form camera left.

Sunday, May 1, 2011

27/52 - Coke

Coke
Coke

I decided to use a can of Coke as this week's entry for the project. I wanted the shot to have a cold feel to it and had visualised the final image fairly quickly. Lighting it was a whole different ball game. I didn't want to photoshop the final image to alter the colours but wanted the ice cubes to be a very specific blue. 

Lighting setup shot and info after the jump.

Lighting Setup- Coke

I tried several shots using a full CTB, a 1/2 CTB and a 1/4 CTB but was not too happy with the results. Shooting through a piece of white A4 paper didn't work either. Changing the white balance on the camera to "tungsten" got me closest to the colour I was after. 

I used a Canon 430 EX II fired at 1/32 from under the can as the primary light for the ice. The light from this flash provided the cool blue tones.

I bounced a Canon 580 EX II, fired at full power through a CTO, off the ceiling for fill light. The CTO gel was used to neutralise the white balance setting on the camera. This light combined with the light from the 430 EX created the exact blue which I was after. The fill light also lit the can itself.

The fact that the ice cubes were melting added to the degree of difficulty for this shot as I had to work fast and think on my feet.  

Tuesday, April 26, 2011

26/52 - Wall-e Sees Red

Wall-e Sees Red
Wall-e Sees Red

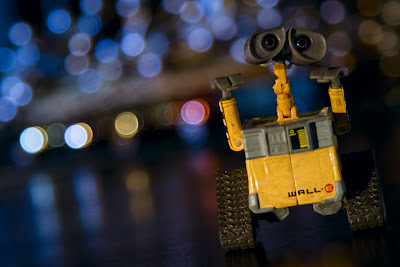
This week's entry for the project was a bit hurried. I just got back to Sydney after a five day long weekend and realised that I hadn't taken a shot for this week. I thought of shooting something relating to Easter but ditched the idea and went for Wall-e instead. I hadn't used the red gels for a while and thought I'd give them ago. I created the bokeh for this shot using marbles.

Setup shots after the jump.

Lighting setup - Wall-e Sees Red

Wall-e was lit using a CTO'd Canon 580 EX shot at 1/128th and zoomed to 105mm. I placed a white book on the left side of Wall-e to bounce the light back onto him from the opposite direction.
A Canon 430 EX II was fired at 1/32 through a Red gel at the black foam-core board to create the red background and light some of the marbles to create bokeh.

Monday, April 18, 2011

25/52 - Whisk

Whisk

This weeks subject was a whisk which I found in the kitchen. I wasn't sure how I was going to use it initially and started experimenting with it to create bokeh. After shooting a number of frames with it, I decided to use the whisk itself as the main subject but shoot it with a shallow depth of field to try and make it look a bit "different". I had the macro lens on at the time and this made things a bit easier.

Lighting info after the jump.

 Lighting Setup - Whisk

This was another two light setup.

The Canon 580 EX II was fired at 1/32 at the background from in front of the subject on camera left through a CTB gel. This light bounced off the handle of the whisk to create a bit of blue bokeh.

The Canon 430 EX II was fired at 1/64th through a CTO gel from behind the subject on camera right. this light lit the inside of the whisk and the handle. This flas was zoomed to 105mm.

I used two black foam-core boards for the background and to place the whisk on. I hadn't used black boards to absorb the light before so it turned out to be a good excuse to try it out.
Let me know what you think in the comments.

Tuesday, April 5, 2011

23/52 - Longines

Longines
Longines

I decided to use the macro lens to photograph my wife's watch as this week's shot for the project. I still haven't used the tripod for macro shots and it's pretty tough without it. The depth of field is so shallow that the slightest movement blurs the image. I used a straight-forward one light setup for this shot.
Setup shot, inside.

Setup - Longines

I used a Canon 430 EX II fired at 1/8th from camera right to light the watch. The light was bounced off a white foam-core board placed just out of frame on the left of the camera. The shot was taken from directly above the watch.

Tuesday, March 29, 2011

22/52 - Stitched

Stitched
Stitched

I got a macro lens over the weekend and decided to use it for this weeks photograph. I hadn't used a macro lens before and it took me a while to get this shot. The part of macro photography that I have taken a while get the hang of is the shallow DOF and figuring out what aperture to use (It's not easy to see the DOF on the LCD at the back of the camera). This shot was taken at f/9. Hopefully practice will make it a bit easier.

Setup shot inside.

Setup - Stitched

This was a single light setup. I used a Canon 580 EX fired from camera right at 1/4th and zoomed to 50mm.

I used a white A4 paper from camera left to bounce the light and fill the other side of the thread.

Tuesday, March 22, 2011

21/52 - A Bottle of Red

A Bottle of Red
A Bottle of Red 

Here's this week's entry for my Project 52. I decided to use a bottle of Shiraz and light it using a straightforward two light setup. I wanted the image to have an overall warm feel to it and I also wanted to bring out the texture of the label on the bottle.

Lighting info and setup shots after the jump.

Setup - A bottle of Red

I used the Canon 580 EX II as the base light for this shot. I fired it at 1/4th power through a CTO gel at the ceiling. The CTO gel was used to warm up the light a little. The strobe was zoomed at 24mm.

The Canon 480 EX II was used as the key light. I fired it, aimed at the bottle, at 1/64th and zoomed to 105mm to light the top edge of the bottle. It is this key light that brings out the texture of the label.


Tuesday, March 15, 2011

20/52 - Wall-e Meets Bokeh

Wall-e Meets Bokeh
Wall-e Meets Bokeh 

I decided to use Wall-e for this weeks shot too. I wanted to do something with Bokeh as I hadn't created any Bokeh for my more recent shots. This was a two light setup which took a bit of time to perfect. I suppose the fact that I didn't know exactly what I was after when I started, didn't help. I took a few different shots, each with their own lighting setup before settling for this one.

Lighting setup shots inside.

Lighting Setup - Wall-e Meets Bokeh

This shot was lit with two strobes.

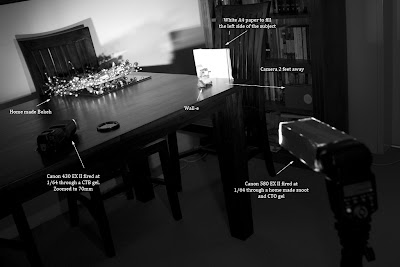
I used a Christmas wreath to create the Bokeh in the background. A Canon 430 EX II was fired at the wreath at 1/64th through a CTB gel to create the Blue Bokeh. I used the same wreath in this shot as well as this one.

Wall-e was lit using a snooted Canon 580 EX II fired at 1/64th through a CTO gel. I used a piece of white A4 paper just out of frame on the right of the camera to bounce the light back onto the opposite side of Wall-e. The effect of the piece of paper is subtle. 

Monday, March 7, 2011

19/52 - Wall-e on a Wire

Wall-e on a Wire
Wall-e on a Wire 

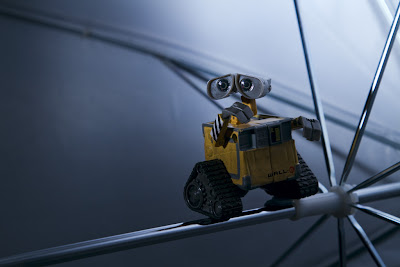
One of my friends at work had this small figure of Wall-e on his desk. I borrowed it for a few days and will use it for a couple of shots on this project. I had seen a similar photograph to this online and decided to recreate it. The lighting for this was quite straightforward and required only a single flash.

Setup shots inside.

Setup - Wall-e on a Wire

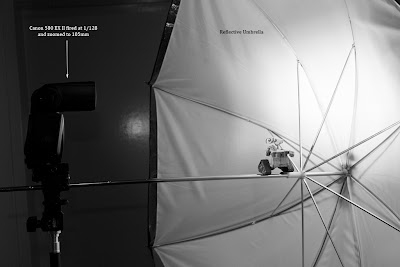
This was a one light setup using the Canon 580 EX II. The strobe was fired at  1/128th and zoomed to 105mm. It was shot into a reflective umbrella which Wall-e is perched on. I changed the colour temperature on the raw file to cool down the light a bit. I could have done this with a 1/4 CTB gel but didn't think of it while I was shooting.

Wednesday, March 2, 2011

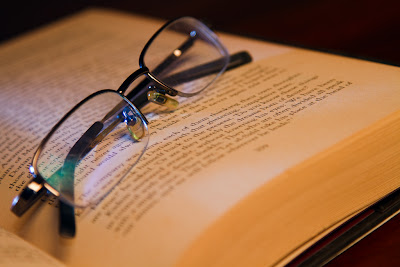
18/52 - A Good Read

A Good Read
A Good Read

This was a bit of a rushed shoot as I didn't get around to taking this weeks photograph over the weekend. I decided to take a photograph of a book and I wanted the final image to have a warm feel to it. Again it was a straightforward two light setup but it took a while to figure out the best position for the second light. I settled on the final image because it showed the texture of the page itself (has to be viewed large) and created subtle shadows.

Read on for lighting info and setup shots.

Lighting setup - A Good Read

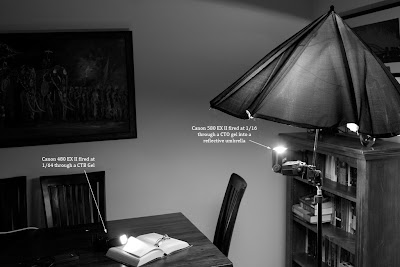
The main light for this image was a Canon 580 EX II fired into a reflective umbrella from camera right. To warm up the light I used a CTO gel. The flash was fired at 1/16th.

The key light was a Canon 430 EX II fired from camera left at 1/64th. I positioned this light so that only small sections of the page and the glasses were lit. This light also created a shadow of the pair of spectacles on the page  to add a bit more interest. A CTB gel was used to cool the key light.

Tuesday, February 22, 2011

17/52 - The Juice

The Juice
The Juice

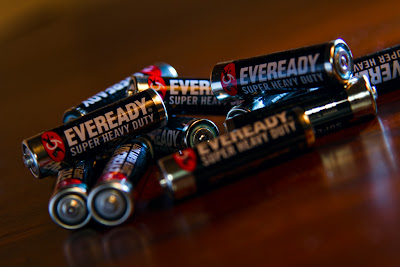
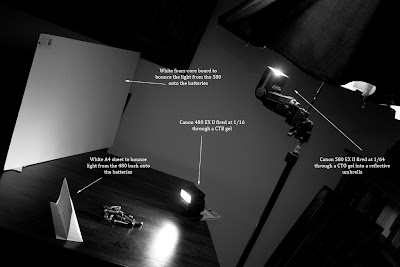
Trying to get my hands on eight batteries which are not flat is a bit of a challenge at my place. Its a bit annoying having to run around looking for them when I'm trying to take shots every week. To get around this, I bought a box of about 30 a few days ago and decided to use some of them for this weeks shot. It was a two light setup again.

Lighting info inside.

Setup - The Juice
Setup - The Juice

I fired the 580 EX II at 1/64th into a reflective umbrella to create the base light. I used a full CTO gel to warm up the light a bit.

The 480 EX II was used as the key light. It was fired from camera right, behind the subject. I used a CTB gel on this light to cool the key light.

I wanted a few of the batteries to be out of focus so I used an aperture of f4. I had to walk the lights down a bit to balance the exposure. 

Tuesday, February 15, 2011

16/52 - Backlit Oranges

Backlit Oranges
Backlit Oranges

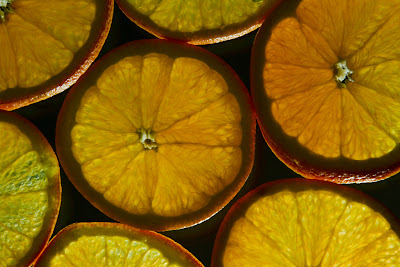
For this weeks shot I decided to go for some backlit Oranges. I used a similar technique to photograph some backlit slices of Kiwi fruit a while ago and I thought I'd build on it for this shot. I used only a single flash for the shot of the Kiwi fruit and it worked well because the Kiwi fruit has a very thin layer of skin. It wasn't as effective for the Oranges as they have thicker skin. If I used the same technique the oranges would have a black ring around the pulp.

Lighting info and setup shots inside.

Setup shot - Backlit Oranges

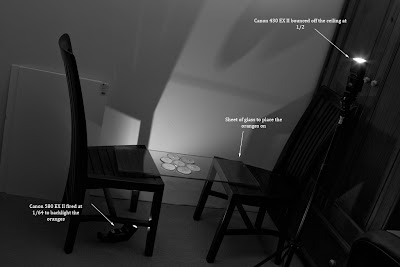
The main light for this shot was a canon 580 EX II fired from below the Oranges towards the camera. It was fired at 1/64 and it lit up the pulp on the slices of Orange.

The second light, which was my fill light, was a Canon 430 EX II bounced off the ceiling at 1/2 power. The light from this flash lit up the white area around the pulp. The effect is very subtle but it lit up a section of the fruit which would otherwise have been black.

Monday, February 7, 2011

15/52 - Hard Disk

Hard Disk
Hard Disk

One of my friends at work had a whole bunch of old hard disks on his desk so I thought I'd use one for this weeks photograph. The disk was from a laptop and therefore fairly small in size. I used the 50mm f\1.8 lens to shoot this as I was initially going for a very shallow depth of field. As it turned out, I changed my mind and shot at f\8 but still used the same lens.

Lighting info after the jump.

Lighting setup - Hard Disk

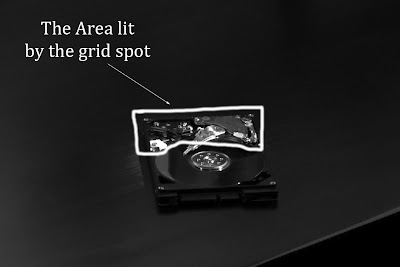
This again was a 2 light setup but instead of using a snoot I opted for a home made grid spots. Grid spots are very similar to snoots but it is used to light only a very small area of the subject. See image below for an idea of how you can control light using a grid spot.

I used the Canon 580 EX II fired from camera left, at 1/32 through a CTB gel and bounced the light onto the hard disk using a white foam-core board placed on the right of camera. I changed the white balance to tungsten to enhance the blur light.

I fired a Canon 430 EX II from high camera right, through a grid spot and CTO gel at 1/2 power, aimed at the top corner of the hard disk. I used the CTO gel to compensate for the tungsten white balance setting on the camera.

The effect of the grid spot can be seen in the image below.

Area lit by Grid spot

If I had used a snoot for this shot, the entire hard disk would have been lit up by the 430 EX II and I would have been unable to get the blue "feel" which I was after.


Monday, January 31, 2011

14/52 - Coke

Coke
Coke

This photograph appeared on strobist a while ago and I was amazed at how "different" it was. I had never seen "Coke" photographed like this before. I have been meaning to try and reproduce this shot since then but hadn't got around to it for one reason or another. Since the point of my project 52 is to learn to light, I thought of shooting it for this weeks entry.

Lighting info and setup shots inside.

Coke - Setup shot
Coke - Setup shot

This again was a basic two light setup.

The Canon 580 EX II was fired at 1/8 through a CTO gel and a shoot through umbrella, from camera left.

I bounced the light from the Canon 430 EX II , fired at 1/32, off a white foam-core board placed behind the subject.

The photograph was taken from above the glass.

If I shoot this again, I'd probably use a macro lens to make the bubbles more prominent. I used the 24-105mm lens for this and wasn't able to get closer because of the lens's minimum focusing distance. The hardest part of taking this photograph was getting the bubbles to look right.
My Ping in TotalPing.com
Related Posts Plugin for WordPress, Blogger...
Get Paid To Promote, Get Paid To Popup, Get Paid Display Banner