Thursday, June 30, 2011

Humpbacks in Sydney

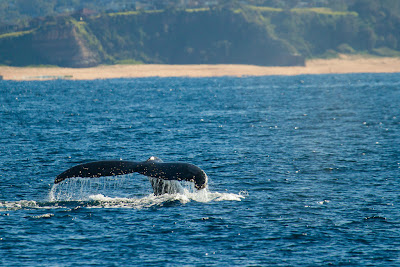
A Humback Whale dives

The migratory season for Humpback Whales is well underway and a large number of them are currently making their way north from the Antarctic Ocean toward the breeding grounds in North Queensland. One of our friends got us tickets to go Whale watching and we booked the trip for last weekend.

More photographs inside.

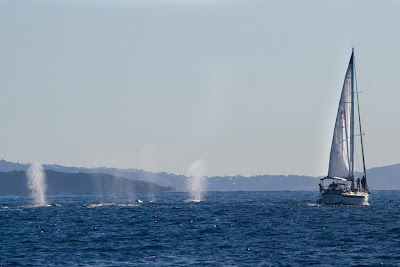
Whales surface close to a boat
 Whales surface close to a boat

We were lucky not to have to go looking for Whales when we went out. As soon as we headed out of the harbour the skipper was informed that whales had been sighted just north of the heads. The trip north didn't take too long and we soon came up to a number of stationary whale watching boats. Apparently Humpbacks dive for about 5 minutes on average and we didn't have to wait long before they surfaced.

A Humpback Whale dives off the coast of Sydney

They didn't seem to be too bothered by the large number of boats which were in the vicinity. They were quite inquisitive and came close to the boats on a number occasions. At one point they were just 5 or 10 meters away. The water was quite clear and we saw them swimming under the boat on a number of occasions.

Whales surfacing
Whales surfacing

We sighted about four or five separate pods over the entire trip. Since there were so many Whales the boats were quite spread out and didn't crowd them. The Whales were not the most playful and we were not lucky enough to see them breach. They lifted their tails out of the water very often as they dived and we saw a few whales slapping their flukes.

A Humpback slaps a fluke
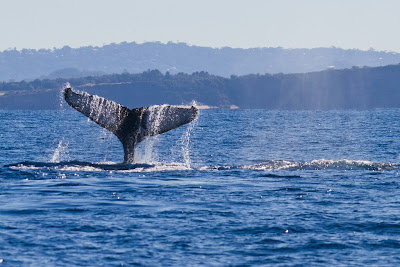

These photographs were captured with a Canon 7D and the 100-400mm lens. The ISO performance on the camera and the great light helped me get some sharp photographs. My only regret is not having taken a Circular Polariser on the trip.

A Humpback tail slapping


Monday, June 27, 2011

35/52 - Yet another pair

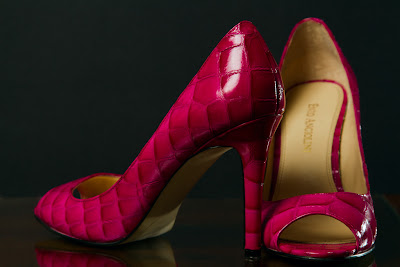
A pair of high heeled shoes
Yet another pair

I've never understood women and their need for shoes. However, with my wife bringing so many of them home I guess it was only a matter of time before I decided to photograph them as part of this project. I went for a black background to make the colour of the shoes stand out a bit. 

Lighting setup after the jump.

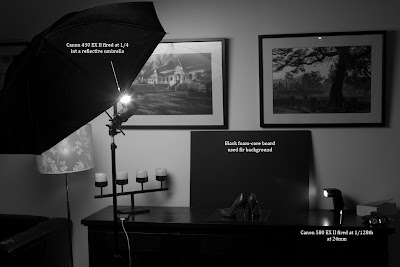
Lihting setup for a pair of high heeled shoes
Lighting setup - Yet another pair

This was a two light setup.

I fired the Canon 430 EX II at 1/4th into a reflective umbrella. This was the main light and also created the specular highlight on the back of the shoe on the left. 

I used the Canon 580 EX II fired at 1/128th as the key light. It's effect is subtle. The highlight on the shoe on the right and the back of the shoe on the left were created by it. 

I also used a black foam-core board as the background and placed the shoes on a piece of glass to create a reflection.

Friday, June 24, 2011

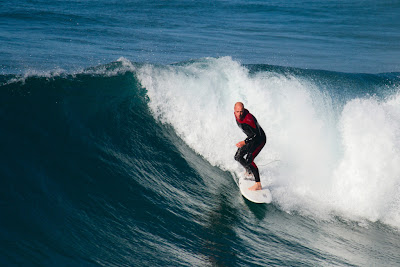
Surfers at Bronte

A surfer at Bronte
Carving it up at Bronte

* Photographs must be viewed at a larger size. Please click on each image.

The weather last weekend was the best we've had in Sydney for a while. I decided to take advantage of it and headed out to the Eastern Beaches to do some surf photography. Bronte and Tamarama were the locations of choice due to the fact that they are relatively small bays which are surrounded by cliffs. Fortunately the zoom on the 100-400mm lens was sufficient for me to shoot from shore.

More shots inside.

A surfer at Bronte
 The big white

I cranked up the ISO on the 7D to freeze the droplets of the waves as they broke over the surfers. I started off with the ISO set to 100 but the shutter speeds I was able to get were not fast enough. The fast shutter speed also allowed me to shoot without a tripod which was a handy bonus.

A surfer at Bronte
In the drink... almost

I think the facial expressions of the surfers added a lot to these images. I was pleasantly surprised that the zoom on the 100-400 was long enough to capture the facial expressions of the surfers. It was a bit hard to gauge exactly how far away the surfers were because I was on top of a 40 meter cliff. I'd guess they were close to 300 m away.

A surfer at Bronte
The green wall

The surfers in these shots are all positioned on the right of the image as they were all taken at Bronte where the break was from the right. I tried a few compositions with the subject on the left but the white water didn't really add to the overall compositions. They images were a lot more dynamic when "the wall" was more dominant. The only exception was the shot below.

A surfer at Bronte
The Break

The day got off to a great start when a pod of 8 humpbacks made an appearance a few hundred meters off shore. The surfers paddled out beyond where the waves broke and sat on their boards watching the pod for about 45 minutes. At times they would have been no more than 50 meters apart. They swam off towards Bondi and disappeared. We are going whale watching on Sunday and hope we get lucky again.


Monday, June 20, 2011

34/52 - A Mars a day

A Mars a day
A Mars a day

The inspiration for this weeks entry for the project came from an advertisement for Mars bars that runs on TV. The actual shot in the commercial is a lot closer than this one but I wanted to include the texture of the chocolate on the top of the bar and had to shoot a bit wider as a result. I felt this composition was better than a zooming right into the chocolate and making the nougat the dominant feature.
Lighting setup after the jump.

Lighting setup - A Mars a day

This was a two light setup.

The texture for the chocolate came from the main light which was a Canon 430 EX II fired at 1/8th into a reflective umbrella which was placed behind the subject on the right of camera (about 2 o'clock on the final shot).
The insides of the chocolate was lit by a Canon 530 EX II fired at 1/16th through a home made grid spot from below the subject. The chocolate was placed on a piece of glass and this created a reflection. 

A Piece of white paper was placed just out of frame on camera left to bounce the main light onto the subject and light the other side of the chocolate.

A black foam-core board was placed behind the chocolate for the background.

Thursday, June 16, 2011

Red Browed Finch

Red-browed Finch - Neochmia temporalis

The Red-browed Finch was one of several species we spotted around the Barrington tops area. Although it wasn't a lifer for me, it was the first time I managed to photograph them. Photographing them isn't easy as they are constantly moving while they forage on the floor. They were feeding in the undergrowth and the combination of the canopy and the undergrowth guaranteed that the quality of light wasn't the best.

More photographs after the jump.


Red-browed Finch - Neochmia temporalis

There are four "races" of Red-browed Finch and they are spread along the east coast of Australia. They are found in undergrowth forests, grassy clearings, coastal scrubs, heath, mangrove habitats. Females are similar in appearance to mails. This Red-browed Finch is also known as Red-browed Firetails.

Red-browed Finch - Neochmia temporalis

I used the 100-400mm Canon lens and the 7D to photograph these birds. I pushed up the ISO to about 400 from memory for these shots. In hindsight I should have pushed it up a bit more!

Red-browed Finch - Neochmia temporalis

Sunday, June 12, 2011

33/52 - The Macro

The Macro
The Macro

I photographed my macro lens for this weeks entry. The challenge with this photograph was controlling the specular highlight on the lens itself. I had thought the process through and was happy with the fact that I had to actually use only one light setup. At lest I seem to be learning something! I used a two light setup for this one.

Lighting setup shots after the jump.

Lighting setup - The Macro

The lens was lit using a snooted Canon 430 EX II fired at 1/8th through a 1/2 CTB gel. I used the snoot because I only wanted a section of the lens to be lit. The highlight on the edge of the lens was created by this flash.

The specular highlight on the lens was created by a Canon 580 EX II fired at 1/32 into a white foam-core board on the right of the frame. 

Thursday, June 9, 2011

Brown Ringlet

Brown Ringlet - Hypocysta metirius

I photographed a number of Brown Ringlets while I was up at the Barrington Tops. Since I was out early almost every morning I managed to photograph them while they warmed up in the early morning sun. Due to the fact that they were still "warming up", I was able to get really close to the butterfly. Having the 100-400mm lens on also helped.

More images after the jump.

Brown Ringlet - Hypocysta metirius

The Brown Ringlet is a small butterfly and has a wingspan of around 55mm. I would have liked to get a bit closer to photograph them but was restricted by the minimum focusing distance on the 100-400mm lens. It would have been good to use the 100mm lens to photograph them but I didn't want to missout by going indoors to change the lens,

Brown Ringlet - Hypocysta metirius

I'm not sure how other photographers set about photographing butterflies. Do they approach butterflies once they settle on a plant or do they set up hides and wait for the butterfly to settle? The second option could be time consuming and may lead to people "baiting" the butterflies. I've never baited animals for photography before and I am not too keen to start it now.  What do you guys think?

Brown Ringlet - Hypocysta metirius

All photographs on this post were captured with the Canon 7D and the 100-400mm lens.

Monday, June 6, 2011

32/52 - The Rose

The Rose
The Rose

This weeks entry for the project was fairly quick and pain free. I used a single strobe and the macro lens to produce the shot above. I did move the flash around a bit to add a bit more depth to the image by creating shadows of the layers of petals. I converted the shot into a black and white image and I'm quite happy with the result.

Lighting setup shots and a black and white version after the jump.

Lighting Setup - The Rose

I used a Canon 580 EX II fired at 1/16th to light the flower. Looking down at the end result, the strobe was positioned at about 2 o'clock. The flower used for the shot is highlighted in the setup above.

Here's the black and white version.

The Rose in Black and White


Thursday, June 2, 2011

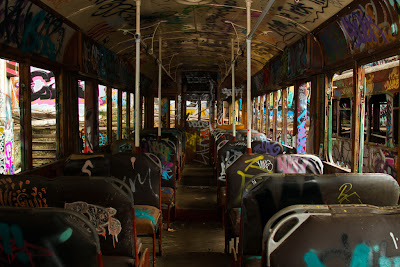
The Tram Sheds - Glebe, Sydney

Some of the Trams - Glebe Tram sheds

The Tram sheds in Glebe have been popular among photographers for ages. The sheds belong to the Harold Park Paceway and although they are locked, getting into them is pretty easy. The sheds themselves are two massive rooms covered in graffiti. Inside, there are 7 old Trams and a bus. The trams and the bus too are covered with graffiti.

More photographs after the jump.
A Panorama of the Tram Sheds in Glebe
 A Panorama of the Tram Sheds in Glebe

Last week I read an article in the papers about a proposal to clean up the tram yards and restore the trams. I had a seen a number of really good photographs online and I had been waiting for an opportunity to get down there. Reading the article was the kick I needed. I called one my friends and made plans to head down there on Sunday morning!

Some of the Trams - Glebe Tram sheds
Apart from photographers, the sheds are used for filming advertisements and TV programs. While we were there another photographer came in with a model for what looked like a portfolio shoot. A second group came in just as we were leaving.  So much for having the place to ourselves at 8.00AM on Sunday morning!

One... flat tyre - Tram sheds, Gebe

I took the 7D with the Canon 24-105mm lens on this trip. I wasn't sure what sort of focal length would be useful so decided to go for a zoom lens. I also took along the two speed lights and the tripod. I only used the speed lights for a couple of shots but the tripod came in very handy.

Interior of a Tram - Tram Sheds, Glebe

I'm not sure exactly when the restoration work on the sheds are going to start, so if anyone is interested in shooting inside, I'd suggest you get there fast. If you want some inspiration, check out flickr or any of the photo guides online.

The Lone Wolf - Tram Sheds, Glebe

If you'd like to see more photographs of graffiti, check out - Hosier Lane in Melbourne.


My Ping in TotalPing.com
Related Posts Plugin for WordPress, Blogger...
Get Paid To Promote, Get Paid To Popup, Get Paid Display Banner